⭐ QUICK ANSWER
Mix sweetened ricotta with pistachios and citrus zest, pipe it into crisp cannoli shells, and finish with powdered sugar and fresh mint.
That’s the whole formula: drain → mix → chill → pipe → garnish → serve.

📝 QUICK STEPS
🥣 Drain ricotta overnight for thick, creamy filling.
✨ Mix filling with powdered sugar, vanilla, pistachios, and zest.
❄️ Chill the mixture for 20–30 minutes.
🥛 Pipe filling into cannoli shells from both ends.
🌿 Garnish with pistachios, powdered sugar, and fresh mint.
🍽️ Serve immediately for maximum crispness.
🛒 QUICK INGREDIENT LIST
🥛 Ricotta (whole milk, drained)
🍬 Powdered sugar
🌰 Pistachios (finely chopped)
🍊 Orange zest
🍫 Mini chocolate chips (optional)
🍦 Vanilla extract
🥠 Cannoli shells
🌿 Fresh mint
❄️ Powdered sugar for dusting
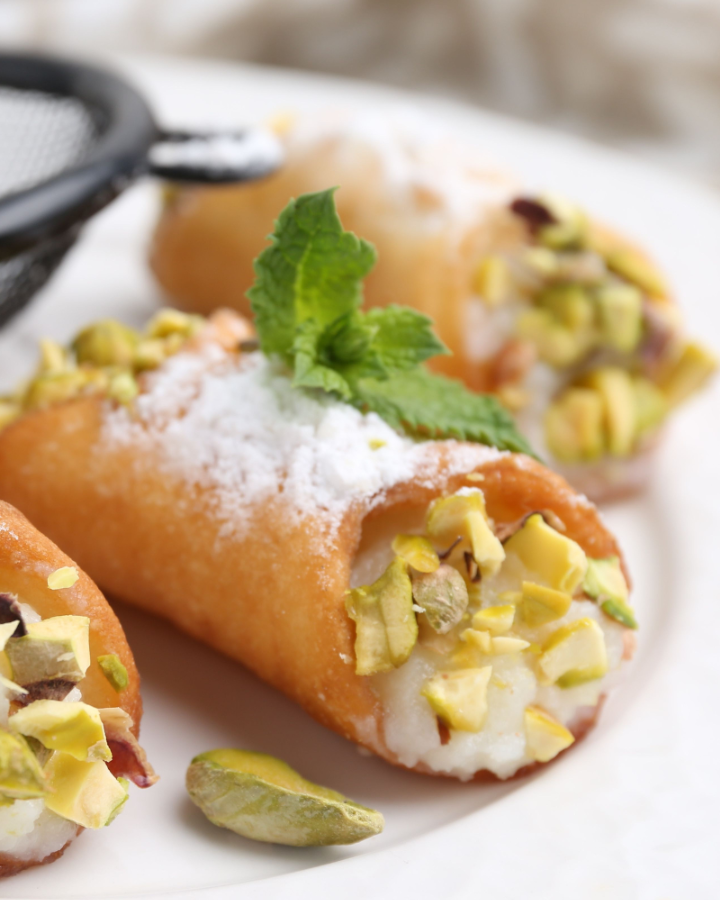
✨ A crispy, creamy Italian classic — perfected for holiday gatherings, brunches, and festive dessert boards.
Nothing says “holiday celebration” quite like a plate of crisp cannoli filled with sweet, silky ricotta and crunchy pistachios. These Pistachio Ricotta Cannoli with Powdered Sugar and Fresh Mint strike the perfect balance between creamy, crunchy, festive, and fresh — exactly what a Christmas dessert should be.

Pistachio Ricotta Cannoli - This dessert actually contains protein and healthy fats
And here’s something most people don’t realize:
This dessert actually contains protein and healthy fats thanks to ricotta and pistachios. Ricotta contributes muscle-supporting protein and calcium, while pistachios offer heart-healthy fats, antioxidants, and fiber. Paired together, they create a surprisingly nourishing dessert option to enjoy at brunch, as a holiday appetizer-style sweet, or as a stunning finale to your Christmas dinner.

A Personal Story about me and Pistachio Ricotta Cannolis
These cannoli became a family staple for me after a Naples trip years ago. I remember the baker dusting powdered sugar so heavily it looked like Christmas morning snow. The shells crackled as you bit in, giving way to a pistachio-studded, mint-kissed filling so smooth it almost melted.
Now, every December, I recreate that magic — filling shells minutes before guests walk in so they stay unbelievably crisp. It's one of those recipes that instantly becomes tradition.
📋 Pistachio Ricotta Cannoli RECIPE AT A GLANCE
| Feature | Details |
|---|---|
| Prep Time | 25 minutes |
| Fill & Assemble Time | 30–40 minutes |
| Total Time | 1 hour |
| Yield / Servings | 12–16 cannoli (holiday party–ready) |
| Difficulty | Easy — classic, but beginner-friendly |
| Best For | Christmas gatherings, brunch boards, dessert platters |
| Flavor Profile | Creamy ricotta, nutty pistachio, citrus zest, sweet powdered sugar, fresh mint |
| Health Highlights | Ricotta provides protein + calcium; pistachios add healthy fats + antioxidants |
🍽️ Ingredients needed to make Pistachio Ricotta Cannoli
Makes 12–16 cannoli — perfect for a holiday family reunion
Filling:
- 2 cups whole-milk ricotta, drained overnight
- 1 cup powdered sugar
- 1 teaspoon pure vanilla extract
- 1 tablespoon orange zest
- ½ cup finely chopped pistachios (plus 2–3 tablespoon for garnish)
- ¼ cup mini chocolate chips (optional)
- Pinch of cinnamon (optional)
- Tiny pinch sea salt
Shells & Garnish:
- 12–16 cannoli shells (homemade or store-bought)
- Extra pistachios, finely chopped
- Powdered sugar, for dusting
- Fresh mint leaves

👩🍳 How to make Pistachio Ricotta Cannoli
Step 1 — Drain the ricotta (12–24 hours) — make this the night before
Line a fine-mesh strainer with a double layer of cheesecloth or 3 layers of paper towel. Scoop 500 g (2 cups) whole-milk ricotta into the cloth. Cover and refrigerate 12–24 hours to remove excess whey.
Look for: the ricotta should be noticeably thicker and not watery when you stir it.
Troubleshoot: if still runny after 12 hours, gather the cloth and press lightly with the back of a spoon for 10–20 seconds, then refrigerate another 2 hours.
Step 2 — Prepare bowls & tools (5 minutes)
Chill a medium mixing bowl in the fridge for 10 minutes. Line a small bowl with paper towel to reserve any extra whey. Have a spatula, measuring spoons, and a piping bag (or large zip-top) ready.
Photo idea: chilled bowl + drained ricotta in cheesecloth.
Step 3 — Make the filling base (5–7 minutes)
Into the chilled bowl add drained ricotta (≈500 g / 2 cups), 120 g powdered sugar (1 cup), 1 teaspoon (5 mL) vanilla extract, and 1 tablespoon (6–8 g) orange zest. Stir gently with a spatula until smooth and uniformly sweet.
Sensory cue: the mixture should be thick, glossy, and hold soft peaks when lifted with the spatula.
Troubleshoot: if the filling looks grainy, pass it through a fine sieve or beat briefly with a hand mixer on low for 10–15 seconds.
Step 4 — Fold in mix-ins (1–2 minutes)
Fold in 70 g (½ cup) finely chopped pistachios and 40 g (¼ cup) mini chocolate chips (optional). Add a pinch of cinnamon and a tiny pinch of sea salt to balance the sweetness. Fold gently — do not overwork the ricotta.
Look for: evenly distributed pistachio pieces without streaks of fat or loose liquid.
Step 5 — Chill the filling (20–30 minutes)
Cover and chill the filling 20–30 minutes in the refrigerator. Cold filling pipes cleaner and keeps shells crisp longer.
Pro tip: Place the piping bag in the fridge for the last 10 minutes to firm it slightly.
Step 6 — (If making shells) Fry or bake shells — exact temps
- Frying: Heat oil to 190°C / 375°F. Fry shells 2–3 minutes each, turning once, until deep golden. Drain on a wire rack.
- Baking (for store-bought pastry shells or alternative): follow package directions (most baked shells are pre-baked). To re-crisp, place shells on a tray in a 150–160°C / 300–325°F oven for 4–5 minutes.
Safety note: keep oil temperature steady — too cool = greasy shells; too hot = burnt outsides, raw insides.
Step 7 — Prepare piping method (2 minutes)
Fit a large round or star piping tip to your piping bag. If using a zip-top bag, fill and snip a 1.0–1.5 cm corner. Transfer chilled filling into bag.
Photo idea: close-up of bag tip and texture of filling.
Step 8 — Fill the shells (3–5 minutes)
Pipe filling from one end of the shell toward the center, then repeat from the opposite end so the center isn’t overstuffed. Aim for a gentle, even pressure — don’t jam the shells. Fill until each end is slightly heaping.
Sensory cue: you should see the creamy filling slightly bulge at both ends but not spurt out.
Troubleshoot: if shells crack while piping, the shell may be brittle — fill more gently or consider serving as cannoli-style cups (break shells and spoon filling).
Step 9 — Garnish & finish (2 minutes)
Dip or press the filled ends into extra chopped pistachios (2–3 tbsp). Dust each cannoli generously with powdered sugar and tuck a small fresh mint leaf beside each end for a festive look. Serve immediately.
Photo idea: overhead shot of 4–6 cannoli on a festive platter with mint.
Step 10 — Serving & short storage (immediately – 2 hours)
Serve right away for crisp shells. If you must hold them, keep refrigerated and plated for up to 2 hours. For longer storage, keep shells and filling separate and assemble at serving time.
⭐ Tips for Success
- Draining ricotta is the #1 key to thick, luxurious filling.
- Chill everything — filling, piping bag, even the shells if needed.
- Don’t fill ahead more than 1–2 hours.
- Use high-quality shells — they matter!
- Toast pistachios briefly for deeper holiday flavor.

🔄 Variations On This Recipe
🎄 Christmas Cannoli Bar
Set out bowls of chocolate chips, chopped nuts, citrus zest, crushed candy canes.
🍫 Chocolate-Dipped Shells
Dip shell edges in melted chocolate and let harden.
🍯 Ricotta-Honey Cannoli
Replace ¼ of powdered sugar with honey.
🍋 Lemon-Mint Cannoli
Swap orange zest for lemon zest and double the fresh mint.
🌱 All-Pistachio Version
Skip chocolate chips — double the pistachios for pure nutty bliss.

🥇 Pro Tips
- Freeze the piping bag for 5 minutes if filling softens.
- A star tip makes the filling look bakery-perfect.
- Dust powdered sugar twice — once before plating, once before serving.
- Add a micro-pinch of salt to enhance sweetness.

🧮 Nutritional Information (Approx per Cannoli)
- 230–260 calories
- 5–7g protein
- 13–16g fat
- 24–28g carbs
- Ricotta = quality protein + calcium | Pistachios = heart-healthy fats

🧊 STORAGE & MAKE-AHEAD TIPS
- Store filling & shells separately.
- Filling lasts 3 days refrigerated
- Shells last 1–2 weeks at room temperature
- Never fill early unless serving within 1–2 hours.
- Re-crisp shells in a 300°F oven for 4–5 minutes.
- Ricotta filling does NOT freeze well, but shells freeze beautifully.
- Make-ahead hack: Keep filling in a sealed piping bag until ready to use.

🍽️ WHAT TO SERVE WITH
Perfect pairings for your holiday table:
- Espresso, cappuccino, or holiday coffees
- Limoncello, amaretto, or dessert wines
- Fresh fruit trays or citrus salad
- Tiramisu bites, biscotti, or almond cookies
- Festive brunch boards
- Christmas dessert grazing platters
❓ FAQS ABOUT PISTACHIO RICOTTA CANNOLI
Why did my shells turn soft?
They were filled too early — fill only at the last minute.
Can I use part-skim ricotta?
Yes, but drain longer.
Do I really need to drain ricotta?
Yes. It’s the difference between perfect and watery filling.
Can I make these gluten-free?
Yes — use gluten-free cannoli shells.
Can kids eat these?
Yes — unless using limoncello or alcohol variations.
What if my filling is too thin?
Chill it, add more powdered sugar, or continue draining.
📌 PIN THIS RECIPE FOR LATER
Save this festive Pistachio Ricotta Cannoli recipe to your Christmas Dessert Boards, Italian Baking collections, and Holiday Brunch boards on Pinterest.
Tap the image below to PIN it for later!
🛡️ FOOD SAFETY
- Refrigerate ricotta filling within 2 hours.
- Always use clean utensils when filling shells.
- Discard dairy-based desserts left out too long.
- Wash hands before handling fillings.
- Keep nuts stored separately from raw ingredients.

⭐ Pistachio Ricotta Cannoli with Powdered Sugar and Fresh Mint
Ingredients
🍽️ Ingredients needed to make Pistachio Ricotta Cannoli
Makes 12–16 cannoli — perfect for a holiday family reunion
Filling:
-
- 2 cups whole-milk ricotta, drained overnight
-
- 1 cup powdered sugar
-
- 1 teaspoon pure vanilla extract
-
- 1 tablespoon orange zest
-
- ½ cup finely chopped pistachios (plus 2–3 tablespoon for garnish)
-
- ¼ cup mini chocolate chips (optional)
-
- Pinch of cinnamon (optional)
-
- Tiny pinch sea salt
Shells & Garnish:
-
- 12–16 cannoli shells (homemade or store-bought)
-
- Extra pistachios, finely chopped
-
- Powdered sugar, for dusting
-
- Fresh mint leaves
Instructions
👩🍳 How to make Pistachio Ricotta Cannoli
Step 1 — Drain the ricotta (12–24 hours) — make this the night before
Line a fine-mesh strainer with a double layer of cheesecloth or 3 layers of paper towel. Scoop 500 g (2 cups) whole-milk ricotta into the cloth. Cover and refrigerate 12–24 hours to remove excess whey.
Look for: the ricotta should be noticeably thicker and not watery when you stir it.
Troubleshoot: if still runny after 12 hours, gather the cloth and press lightly with the back of a spoon for 10–20 seconds, then refrigerate another 2 hours.
Step 2 — Prepare bowls & tools (5 minutes)
Chill a medium mixing bowl in the fridge for 10 minutes. Line a small bowl with paper towel to reserve any extra whey. Have a spatula, measuring spoons, and a piping bag (or large zip-top) ready.
Photo idea: chilled bowl + drained ricotta in cheesecloth.
Step 3 — Make the filling base (5–7 minutes)
Into the chilled bowl add drained ricotta (≈500 g / 2 cups), 120 g powdered sugar (1 cup), 1 teaspoon (5 mL) vanilla extract, and 1 tablespoon (6–8 g) orange zest. Stir gently with a spatula until smooth and uniformly sweet.
Sensory cue: the mixture should be thick, glossy, and hold soft peaks when lifted with the spatula.
Troubleshoot: if the filling looks grainy, pass it through a fine sieve or beat briefly with a hand mixer on low for 10–15 seconds.
Step 4 — Fold in mix-ins (1–2 minutes)
Fold in 70 g (½ cup) finely chopped pistachios and 40 g (¼ cup) mini chocolate chips (optional). Add a pinch of cinnamon and a tiny pinch of sea salt to balance the sweetness. Fold gently — do not overwork the ricotta.
Look for: evenly distributed pistachio pieces without streaks of fat or loose liquid.
Step 5 — Chill the filling (20–30 minutes)
Cover and chill the filling 20–30 minutes in the refrigerator. Cold filling pipes cleaner and keeps shells crisp longer.
Pro tip: Place the piping bag in the fridge for the last 10 minutes to firm it slightly.
Step 6 — (If making shells) Fry or bake shells — exact temps
- Frying: Heat oil to 190°C / 375°F. Fry shells 2–3 minutes each, turning once, until deep golden. Drain on a wire rack.
- Baking (for store-bought pastry shells or alternative): follow package directions (most baked shells are pre-baked). To re-crisp, place shells on a tray in a 150–160°C / 300–325°F oven for 4–5 minutes.
Safety note: keep oil temperature steady — too cool = greasy shells; too hot = burnt outsides, raw insides.
Step 7 — Prepare piping method (2 minutes)
Fit a large round or star piping tip to your piping bag. If using a zip-top bag, fill and snip a 1.0–1.5 cm corner. Transfer chilled filling into bag.
Photo idea: close-up of bag tip and texture of filling.
Step 8 — Fill the shells (3–5 minutes)
Pipe filling from one end of the shell toward the center, then repeat from the opposite end so the center isn’t overstuffed. Aim for a gentle, even pressure — don’t jam the shells. Fill until each end is slightly heaping.
Sensory cue: you should see the creamy filling slightly bulge at both ends but not spurt out.
Troubleshoot: if shells crack while piping, the shell may be brittle — fill more gently or consider serving as cannoli-style cups (break shells and spoon filling).
Step 9 — Garnish & finish (2 minutes)
Dip or press the filled ends into extra chopped pistachios (2–3 tbsp). Dust each cannoli generously with powdered sugar and tuck a small fresh mint leaf beside each end for a festive look. Serve immediately.
Photo idea: overhead shot of 4–6 cannoli on a festive platter with mint.
Step 10 — Serving & short storage (immediately – 2 hours)
Serve right away for crisp shells. If you must hold them, keep refrigerated and plated for up to 2 hours. For longer storage, keep shells and filling separate and

Leave a Reply